Archive for the ‘Courses’ Category

The Perfect Fifth – Guitar Interval

Monday, June 28th, 2010

Welcome to the complex, confusing, and difficult world that most beginner guitarist affectionately refer to as guitar intervals.

It should be noted that learning the intervals alone can be quite difficult for guitar players, especially if you are just beginning to learn the various names such as major second and perfect fourth. Match this alongside the trouble many beginners have in remembering that guitar sounds one octave lower than written, and you have a subject that most desire to ignore or skip altogether.

According to Mike Hayes, a guitar coach, the numerous years of teaching experience has led him to one simple conclusion in regards to intervals – they’re easy to understand when presented in a particular sequence that the individuals can successfully recall the sound.

The first interval you need to learn is the major third followed by the minor third. Once, you are able to accomplish those feats, the “perfect fifth” is your next grand battle.

The perfect fifth interval is a very common interval and when the two notes of the perfect fifth interval are played simultaneously, they produce what is technically called the “harmonic fifth.” In rock terms, the harmonic fifth is more commonly known as the ”power chord.”

Interesting enough, most guitarists have been playing the harmonic fifth for quite some time, although they do not refer to it by it’s technical title. Similarly, they say most writers understand grammar, yet are unable to dissect the piece and individually label each word by it’s grammatical term.

The same is true of the guitar and it’s relationship to intervals.

Harmonic Fifth

If you would like to hear a phenomenal example of the harmonic fifth, listen to the opening chords of Dire Straits – “Money For Nothing”
 
——-
——-
–7—-
–5—-
——-
——-

YouTube Preview Image

Now that you have an understanding of what the perfect fifth is suppose to sound like, do your best to attempt to hear the interval when played as single notes. Begin by playing the equivalent of middle “C” (piano) on the guitar fretboard. Middle ”C”s reference pitch is the third string; fifth fret.

——-
——-
–5—-
——-
——-
——-

Now play the note “G” (second string; fret eight).

——-
–8—-
——-
——-
——-
——-

Listen closely to the sound of the two notes. That, my friend, is the interval of a perfect fifth when its ascending.

Play the two notes again, this time listening carefully for the “space” between the first note (middle C) and the G. That’s the sound you need to be able to recall.

Now, play the two notes as a chord…

Harmonic Fifth

——-
–8—-
–5—-
——-
——-
——-

Note that this harmonic fifth is different from the one presented earlier in the song, “Money For Nothing.” While it may sound different, the Dire Straits song and the chord you just played are from the same interval only in a different key.

YouTube Preview Image

In order to hear, recognize, and most importantly recall the sound of the perfect fifth interval, GLC further recommends these songs for the ascending perfect fifth:

1. Twinkle, Twinkle Little Star
2. One (Metallica)
3. Star Wars
4. Scarborough Fair
5. Can’t Help Falling In Love (Elvis Presley)

The five songs listed above are just a few of the many that begin with this interval. 

In theory, a guitarist that constantly “looks” for the perfect fifth interval will eventually master the technique in his or her own work.

In other words, we just gave you an excuse to listen to music. Now go!

Mic the Guitar Amp for the Studio

Wednesday, May 19th, 2010

The past decade has presented numerous technological advances to the music industry. From the equipment used to record music to the vary devices that we replay the music with – music technology is advancing more to the common man. It’s growing, changing, and evolving for the best.

For example, in the past, a great guitar sound was reliant on owning a deluxe guitar amp, a quality microphone, and a decent studio or room. These days, with a simulation unit such as a Line6 pod, and a PC, musicians may digitally record a convincing guitar from their very own bedroom.

This proven, but highly undiscovered technique is a hidden gem in the guitar world. Guitarists no longer need an expensive amp to, no pun intended, create a rich sound. You also do not have to own/rent a studio to be able to crank that amp to the kind of volume needed to capture a classic guitar tone.

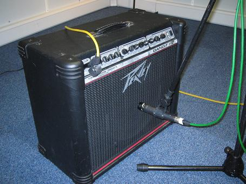
When it comes to miking a guitar amp, there are several different approaches and all of them are very valid. However, it is considered a standard practice to use a dynamic microphone. What is a dynamic microphone? Dynamic microphones are robust, cheap, do not require a separate power source, and are perfect for close proximity miking. Dynamic mics handle high pressure levels well.

Condenser microphones, on the other hand are sensitive, expensive, and need a third-party power source. They are also a very valid recording choice, but not appropriate for everyone’s budget.

TIP: The most commonly used dynamic mic models are the Shure 57 & Sennheiser MD421.

Once you purchase a dynamic or condenser mic, you may now experiment with various miking techniques. As previously mentioned, several different options exist. For example, you may:

  • place a single, dynamic mic close to the speaker
  • place a single, dynamic mic, 6 to 12 inches from the speaker
  • incorporate multiple close, dynamic mics
  • combine close and distant mics
  • or, utilize front and back miking for “open-backed” combo amps

Again, there is no right or wrong answer. The miking technique depends on the sound desired and even professionals will change their method on a case-by-case basis.

Let’s examine some of the more popular techniques listed above.

Single Dynamic Mic CLOSE to Speaker

The microphone is placed directly at the front-center of the speakers center. Set the mic so it nearly, but does not touch the front grill. Varying where, along the radius the mic is placed, will affect the tonality of the recorded sound. Placing it in the middle will result in a bright, punchy sound, while the closer the mic gets to the edge, the darker the tonality will sound.

Single Dynamic Mic, 6 – 12 inches from Speaker

Just like the same technique demonstrated above, only this time the microphone is slightly further from its source. You will capture more room ambiance with this method. It will also result in a more developed sound.

Multiple Mics CLOSE to Speaker

Recording the amp with different mics and blending the sound will result in more dynamic, richer tone. Some engineers will place one dynamic mic dead-center to the speaker and another on the edge. Engineers will also tilt one of the mics slightly off-axis, as this will give another variation to the sound.

Combination CLOSE and DISTANT Mics

If you also own a decent condenser microphone, this method is ideal. Place the dynamic mic(s) close to the amp and the more powerful and sensitive condenser, position anywhere from 6 inches to a few feet away.

Front and Back Miking with “Open-Backed” Combo Amps

Place a dynamic close to the amp and then place a condenser close to the back of the amplifier. The blend will create a nice mix, but keep in mind that this is an advanced technique and could introduce phase issues remedied only by a skilled engineer.

The CAGED Method

Wednesday, May 12th, 2010

I promise you that The CAGED Method is not a name of a band (although that would be pretty sweet). The CAGED Method, is in fact, a simple way to learn the sheer basics of the guitar.

What is The CAGED Method?

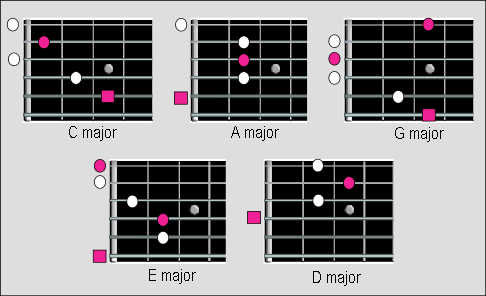
It’s a method that is designed to get your fingers use to switching chords quickly and ultimately building up strength and dexterity in your hands. The method is titled as such because it educates the beginner guitarist on the main chords that are in the majority of songs. And what exactly are those chords? The C, A, G, E & D.

To learn more about each chord, click the following links: C, A, G, E, D. Or, keep reading to learn more about the CAGED method below.

The primary purpose of the CAGED system is to learn the fretboard. Guitarists who incorporate this technique will also learn just about any scale.

cagedroots.gif

In order to begin, the guitarist should look at the octave shapes formed by the Root Notes of each of these chords. The Root Notes are the red notes above. It’s important that you learn these so well that you don’t need to think about them. As you get better at finding the notes on the fretboard you will find it easy to find these chords in any position almost instantly.

By removing all of the notes except for the octave shapes, you can see these patterns more clearly. Note that what you are left with are all the possible ways of fingering movable Octave Patterns.

If the guitarist proceeds to arrange the notes so that they form the word “CAGED,” the individual will then be able to chart every note on the entire fretboard.

YouTube Preview Image

GuitarSource.com provides one of the best examples of the CAGED technique.

If you practice these chord positions regularly until you know them by heart and make sure you practice them in all twelve keys, you will eventually master the CAGED technique. Practice and working on the twelve keys is incredibly important. If you can’t use them in all keys, then you are never going to see any benefit from using this method.

The other primary use of the CAGED system is to help with guitar solos. The chord shapes and positions learned through the CAGED method is instrumental in the foundation needed to discover chord tones, arpeggios, and scales anywhere on the fretboard. You can discover this wealth of information very quickly if you are indeed familiar with the method.

YouTube Preview Image

A great guitar solo isn’t just about choosing the right scale (that’s easy to do for most chord progressions) but is related to the accurate and creative use of chord tones. Scales can be put to good use in a decent guitar lead, however they are often used as the core, the foundation if you like. The best solo’s have character.

They always fit the music perfectly and most of the time this is done by knowing the best notes to use at the best time. Some have the “ear” for a guitar solo while others will learn the proper use of chord tones through practice techniques like The CAGED Method.

Guitar Tricks Review Updated

Monday, January 11th, 2010

I just finished updating the Guitar Tricks review to include some of the more recent changes they’ve made, and my take on them.

Hopefully this will make it even easier to decide if GuitarTricks.com is your best bet for learning guitar.

Amazing Guitar Secrets Review posted

Monday, November 23rd, 2009

I just finished reviewing the popular “Amazing Guitar Secrets” course, and posted the full review on the site.

This DVD course has been updated recently to include a cheaper partially-digital version that makes it a solid contender, which pushed its overall rating to 7.1/10, and in the ‘Honorable Mention’ category of the courses I’ve reviewed.

Check out the full Amazing Guitar Secrets review to learn more…

Beginning Guitar Lessons: “How Long Until I’m Good?”

Tuesday, November 17th, 2009

Note: This is a guest post by Ian, from GuitarLessonsReviewed.com.

The question that is on a lot of beginners minds is “How long will it be before I’m a good guitar player”. Now I know the term good is different for each individual but for most beginners it’s how long before I can play the songs I hear on the radio, jam with friends and maybe play for others at a party or camp fire.

Before we can answer this question I think we first need to take a look at the benefits of self study or private lessons and the variety of different products available to teach yourself to play guitar. So let’s get started.

Private Lessons Vs. Self Study Programs

There isn’t too much question that the potential to become a great guitar player learning directly from someone else who is a great player is very high. Of course how much you practice and progress has a lot to do with it but you’re setup for success when taking private lessons.

The biggest downside to taking private lessons is that often you learn new techniques at a very slow pace which can cause you to lose interest. Contrast this with learning guitar from a guitar lesson dvd course like Learn and Master guitar and you’re in complete control of how quickly or slowly you learn.

If you choose to learn on your own be sure you spend the money on a good self study program like Learn and Master Guitar or a similar video program. This will ensure you learn all the basics and build a good foundation for future learning.

What About Learn Guitar Fast Programs?

There are some ebooks and digital guitar courses that suggest you can learn guitar in one week or even one weekend. Personally, as someone who’s played guitar for several years I cannot see how you could “master” an instrument in one weekend, but I do suppose it’s possible to learn a chord or two and some basic strumming patterns.

My personal opinion is that programs like these offer a big promise they cannot deliver on. If you’re really interested in becoming a great guitar player then don’t waste your time on a product that claims you can learn in one weekend. Spend your money and time wisely on a serious beginner guitar lessons product.

So How Long Until You’re Good?

So back to our original question. I believe it will take a complete beginner 6 months of steady practicing to become comfortable with basic chord shapes and barre chords. You’ll also begin to learn basic scales in that time.

After about 1 year you should have mastered all the major and minor chords, know your most common scales and each of their shapes and positions on the neck and have settled into a particular playing style. At this point you could call yourself a good guitar player.

Of course you’ll be playing songs you enjoy well before that 1 year mark, but don’t make the mistake of stopping your learning at that point. Keep pushing through to learn new skills and techniques so you can become a great guitar player!

Music Master Pro Review Posted

Tuesday, November 3rd, 2009

This is just an update to let everyone know that I just finished my Music Master Pro review.

It has been a long time coming, because so many people have purchased this course, and I wanted to buy it to evaluate myself. I was especially interested in Music Master Pro because of the number of negative comments I had read about it, and after purchasing it and logging into the members’ area, I can see exactly why these comments were made!

Check out the review of Music Master Pro to learn more about this popular guitar course, and compare it to 3 of the most popular alternatives…